


 Follow Us
| GCAT Home |
Catalog Creation |
Kepler GCAT Differences |
Data Access and Products |
SQL CasJobs Access and Examples |
Catalog Access Through CasJobs
Accessing the CasJobs Tables
The best way to use the source catalogs of the GASC/GMSC/Kepler GCAT is via MAST's GALEX CasJobs page. After registering with a free account, users can perform SQL queries on MAST's database tables, including the GALEX source catalogs. These queries, and the resultant output tables, can be stored in CasJobs for future use and retrieval, you can export tables out of CasJobs in CSV or FITS table format, and you can execute much larger and more powerful search queries than are possible with the standard MAST web search interfaces.
You can find documentation and examples in the Help section from within CasJobs. Here we provide a quick explanation of the available GASC/GMSC/Kepler GCAT tables and how you might interact with them. First and foremost, the relevant tables are all found under the GALEX_Catalogs Context in CasJobs. This is one of the most common mistakes for new users, so make sure your Context drop-down menu has "GALEX_Catalogs" selected when in the Query tab before running your SQL commands.
The main source catalogs are stored (from within the GALEX_Catalogs Context) in tables called "gcat_asc", "gcat_msc", and "gcat_kep" for the GASC, GMSC, and Kepler GCAT, respectively. These tables have many columns, including the NUV and FUV fluxes of the sources, coordinates, flux uncertainties, fluxes from different apertures, etc. The first column in these tables is a unique ID within CasJobs called the "casjobsID". It is a negative integer, and is important when using the built-in CasJobs "neighbors" function to do spatial cross-matching. More on that below. The second column, "objid", is the GALEX ID for that specific source, and can be used as references to specific objects in publications, websites, etc. MAST does not recommend using the "casjobsID" as a source identification, because it is an internal reference specific to CasJobs.
The following query from CasJobs will give the objID, RA, DEC, FUV mag, and NUV mag for the 10 brightest NUV sources in the GMSC, and runs in about a second:
	select top 10 objid, ra, dec, mag_fuv as fuv, mag_nuv as nuv
	from gcat_msc
	order by mag_nuv
	objid		     ra		       dec		  fuv	    nuv
	3058544617836258552  5.98761835664748  -72.0716375078831  12.23338  9.486438
	3157201597173339360  259.285626873733  43.1358013502029	  11.23049  9.826953
	2430538760422689110  229.630911015858  2.08173443193517	  11.28833  9.878509
	3365141236218340083  337.379532495358  -20.8188554465577  9.995291  9.966767
	3116774616304981253  210.798202607573  54.3403191233685	  10.38382  10.08485
	2863095430882787329  323.364510629287  -0.822028042642919 11.08296  10.09208
	3058896461557143036  205.544141716492  28.3829646553706	  12.05168  10.1871
	3157447887777960585  294.998814625386  -30.9646548250132  11.7935   10.22913
	3073040441899226082  13.717761579749   -37.6705041694351  10.57295  10.29313
	3116739432704642989  204.225366801716  -29.8502095710621  10.93083  10.31566
Using the Neighbors Function
CasJobs has a built-in, spatial cross-match function called "Neighbors" that allows you to quickly cross-match a table in your database area ("MyDB" Context) against MAST tables in other Contexts. In this section, we will present step-by-step instructions on how to upload a table of targets into MyDB, cross-match against GALEX catalogs, and then interact with the resulting tables.
Step 1: Upload your table of targets.
Upload your table of targets into CasJobs. First, create a comma-separated text file with at least three columns: "id", "ra", and "dec". The column labels should be lowercase, and the coordinates must be in decimal degrees. In our example, we will use a list of Kepler eclipsing binaries, where the first column is the star's Kepler ID. You can download a copy of this file yourself if you'd like to follow along.
After signing into CasJobs, click on the "Import" link on the top menu. Make sure "Import into..." is set to "New Table". Below is a text box where you can enter the name of the table you'd like to create on import. By default this is "MyTable". It is suggested you change the name to something more descriptive. In our example, we will change it from "MyTable" to "KepEBCatalog". Make sure "Format" is set to "Comma/Space/Tab Separated". Make sure "Data Type" is set to "File Import" (if you have a file on disk ready to upload), or choose "Copy & Paste" if you want to copy a table directly into a text editor. In our example we will use the "File Import" option, and press "Choose File" to select the file on our local machine's disk. When ready, press the "Import" button.
Step 2: Perform a cross-match and create a new "neighbors" table.
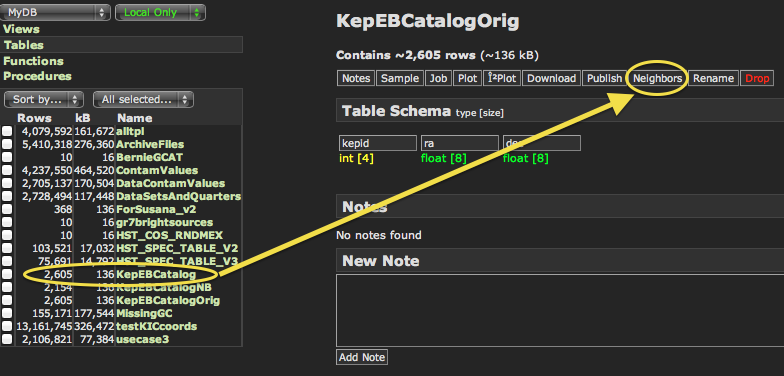
Your table is now uploaded into CasJobs and available from the "MyDB" Context. To see your uploaded table, go to "MyDB" tab in the top menu, and make sure the drop-down menu on the top left of the page is set to "MyDB". Your table should be available on the left side of the page. Next, click on the uploaded table's name. This provides some additional content on the right side of the page: The name of the table, a count on the total number of rows, some additional options like "Sample", "Job", "Download", etc. For this specific tutorial, we are interested in the "Neighbors" option. This option is in small, white text (along with several others) above the larger "Table Schema" text on the right side of the page (Fig. 14 below). Click on "Neighbors" and the Neighbor Search options will appear below. Here, you can specify which Context you would like to cross-match to (in our example, we will be selecting the "GALEX_Catalogs" Context) and a search radius in arcminutes (here, we use 0.1 arcminutes). Finally, you can enter the name of the output table into which you want to store your results. In our example, we will enter "KepEBCatalogNB" as the name of our output table, where "NB" just stands for "neighbors". Hit "Go" when ready.
|
|
Figure 14: The Neighbors function is accessed from MyDB after clicking on the name of one of your tables. You must have columns called "ra" and "dec" (in lowercase), with coordinates in decimal degrees, for the Neighbors function to work.
|
Step 3: Examine the resultant neighbors table.
There are two important actions done by the Neighbors function to be aware of. First, your original input table will have a new column added to it, called "search_id". This new column is added to the right of the table, and is simply the row number of your uploaded table. The Neighbors function needs this "search_id" column in your table to be able to link the output table's rows to your input table's rows. The second important action is that it creates an output "neighbors table" in MyDB. In our example, we used the output name of "KeplerEBCatalogNB", and this table is now available in the MyDB list of tables on the left side of the page. The "neighbors table" contains the columns from your original input table, the "search_id" column it added, and a "matched_id". This "matched_id" corresponds to the "casjobsID" in the various catalog tables in the "GALEX_Catalogs" Context. They are unique, negative integers across all catalogs in the "GALEX_Catalogs" Context. For example, GASC sources will be in the range of -1000000000 ≤ casjobsID < -2000000000, GMSC sources range from -2000000000 ≤ casjobsID < -3000000000, Kepler GCAT sources range from -3000000000 ≤ casjobsID < -4000000000. Sources from the Bianchi et al. catalogs will have similar sets of allowed "casjobsID" values. This makes it easy for users to get all flux measurements for their given sources, or, to select flux measurements from specific source catalogs by applying some very basic filters.
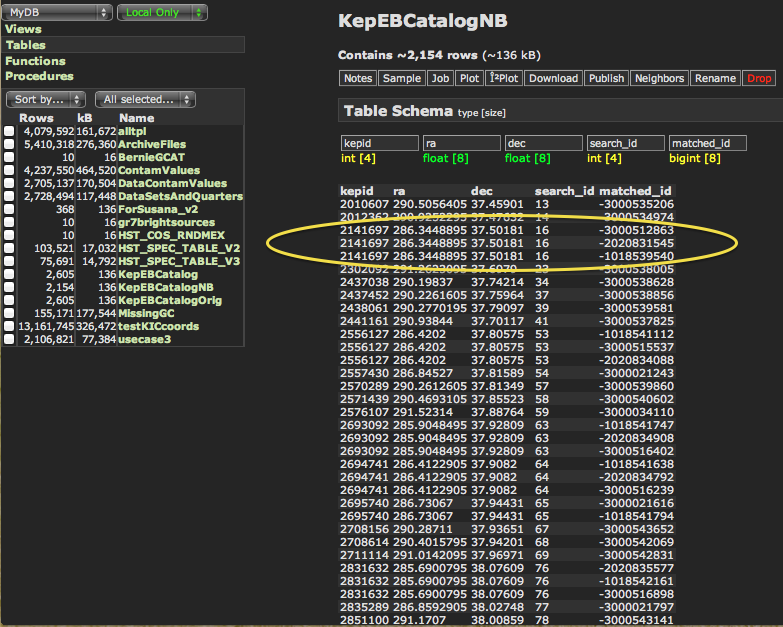
In our example, we see that the "KepEBCatalogNB" neighbors table has 2,154 rows, while the original input catalog had 2,605 rows. Clearly there were some targets with no match in the GALEX catalogs, not surprising at all. If we click on the "Sample" option to preview the first few rows (Fig. 15), we can see the first three columns are our original input columns, then the "search_id" added by the Neighbors function, and finally the "matched_id" equal to the "casjobsID" in the GALEX catalogs. We can see some targets have matches in all three catalogs (GASC, GMSC, and Kepler GCAT; for example, Kepler 2141697), while others only have matches in some of them. These could be due to the different UV brightness of the targets (for GASC vs. GMSC), or the sky coverage of the different catalogs (for GASC/GMSC vs. Kepler GCAT).
|
|
Figure 15: The resultant "neighbors table" includes the "search_id" and "matched_id" added by the Neighbors function. Some targets will be in multiple catalogs, for example, Kepler 2141697 is in the GASC, GMSC, and Kepler GCAT.
|
Step 4: Use the resultant neighbors table.
The "neighbors table" you've just created ("KepEBCatalogNB" in our example) provides the link between your input table and the catalogs in the "GALEX_Catalogs" Context. You can now interact with this table via SQL commands as you would any other table in CasJobs. Probably the most popular next step would be to write some simple SQL queries to pull some (or all) of the columns from one (or more) of the GALEX source catalogs for your targets that had matches. Below we provide two examples of how one might do this. The first gives all columns from all the GALEX source catalogs for the matching Kepler eclipsing binaries. The second gives only a few critical columns from just the Kepler GCAT.
In this first example, we write a SQL query that will get all columns from all GALEX source catalogs for our matches. To do that, we perform an Inner Join on the "matched_id" column from a View called "gcat". This View is just a combination of all the catalogs in the "GALEXCatalog" Context. Since the full query would take up too much memory, we only get the first 10 rows from this query. The SQL command is:
	select top 10 gcat.*
	from mydb.KepEBCatalogNB as nb
	inner join gcat on nb.matched_id=gcat.casjobsid
This results in the following table (Fig. 16). You will notice that, in addition to the "casjobsID", a column containing the catalog each row comes from ("catalogSource") is included in the "gcat" View.

|
|
Figure 16: This sample query performs an Inner Join between the KepEBCatalogNB "neighbors table" and the "gcat" View, giving all columns from all the GALEX source catalogs. Only the first 10 rows are returned in the example query: performing the entire query is too large to handle in CasJobs given the size of the View and the number of targets in our "neighbors table". One would have to apply additional filters to run this query without limits.
|
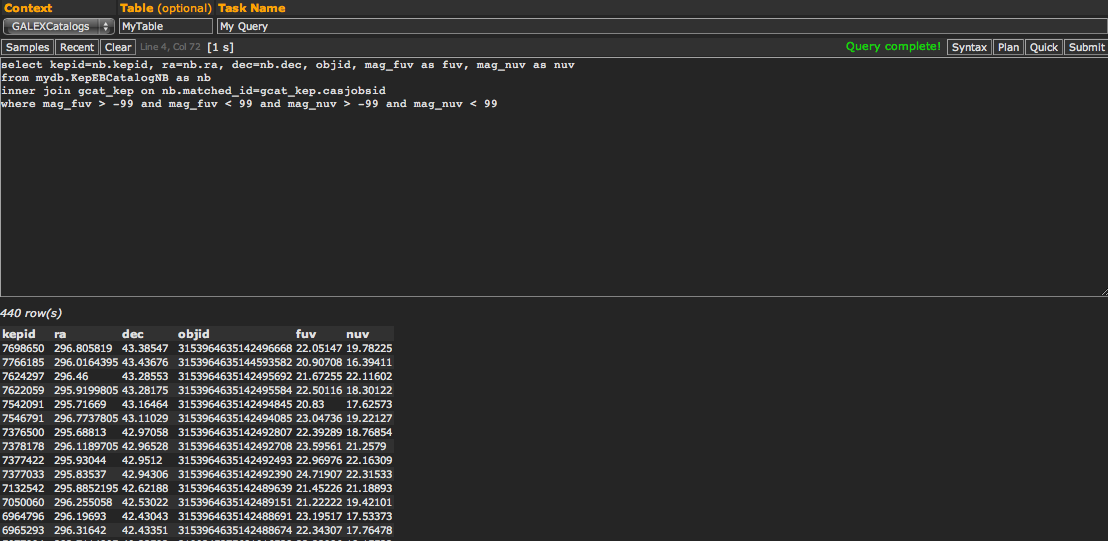
In this second example, we write a SQL query that will get the our original input columns (Kepler ID, RA, DEC), along with the objid, mag_fuv, and mag_nuv for our matched eclipsing binaries from just the Kepler GCAT catalog matches. We apply an additional filter that only gives us those targets that have both FUV and NUV measured. There are several ways one could do this, for example, you could run the same query as above, and then implement a "where" filter to select only those with catalogSource == "KEP", or apply a limit on the range of casjobsID values. Instead, for this example, we will edit our query to perform the Inner Join only on the Kepler GCAT table, as opposed to the combined View as before:
	select kepid=nb.kepid, ra=nb.ra, dec=nb.dec, objid, mag_fuv as fuv, mag_nuv as nuv
	from mydb.KepEBCatalogNB as nb
	inner join gcat_asc on nb.matched_id=gcat_asc.casjobsid
	where mag_fuv > -99 and mag_fuv < 99 and mag_nuv > -99 and mag_nuv < 99
This query is fairly complex for beginners, so we'll break down each line a bit:
- Line 1: We specify the columns we want to retrieve. To make it clear to the query that we want to retrieve the Kepler ID, RA, and DEC from our input table ("KepEBCatalogNB", and not from the GALEX source catalog), we use the assignment operator (e.g., ra=nb.ra, as opposed to ra=gcat_asc.ra). This is especially important if your input table has columns with the same name as the table you are joining, in this example, both tables have columns called "ra" and "dec". We do not bother with the assignment operator for "objid", "mag_fuv", or "mag_nuv", since those columns are only present in the "gcat_asc" table, and SQL can determine which table to use in those cases. Finally, we employ a little column renaming so that our results table will have "mag_fuv" and "mag_nuv" appear as just "fuv" and "nuv" as column names.
- Line 2: To improve readability and handle some quirks with CasJobs SQL interpretation, we assign "mydb.KepEBCatalogNB" to the alias "nb". This allows us to just use "nb" where we would have used the full table name. Think of this as just shorthand notation, and everywhere you see "nb", it's referring to our "KepEBCatalogNB" neighbors table..
- Line 3: This line contains the Inner Join command. Here, we specify that we want to join with the Kepler GCAT catalog table ("gcat_asc"). We want to use the "matched_id" and "casjobsid" columns as the common column between both tables (i.e., "matched_id" in our neighbors table is the same as "casjobsid" in the gcat_asc table, so use that for identifying matched rows).
- Line 4: We apply some filters on our results. In this example, we only want those Kepler targets that have both a valid FUV and NUV magnitude. Since the Kepler GCAT uses -99 and 99 as bad value flags, we ask to return only those rows with magnitudes between those ranges.
|
|
Figure 17: With just a bit more specificity, you can create tables that are ready to immediately ingest into your science scripts, no time wasted on writing your own catalog matching and table output routines. These queries can be done in seconds once you have a basic understanding of SQL and the MAST tables in CasJobs.
|
Calculating Distances
There is a built-in CasJobs function that allows for calculation of (spherical) distances between sources. The example below shows how to calculate angular separations between matches of the input McCook-Sion white dwarf database with the GCAT, as well as those input targets that do not have a GCAT match. Make sure your Context menu is set to "GALEX_Catalogs".
	select McCookSion_WDSample.search_id,
	cast((dbo.fDistanceArcMinEq(nb.ra, nb.dec, gcat.ra, gcat.dec)*60.0) as numeric(20,6))
	as dstArcSec,gcat.*
	from mydb.McCookSion_WDSample as McCookSion_WDSample
	left outer join mydb.McCookSion_WDSample_NB as nb
	on McCookSion_WDSample.search_id=nb.search_id
	left outer join gcat on nb.matched_id=gcat.casjobsid
In contrast, this query returns only those white dwarf targets that have GCAT matches.
	select McCookSion_WDSample.search_id,
	cast((dbo.fDistanceArcMinEq(nb.ra, nb.dec, gcat.ra, gcat.dec)*60.0) as numeric(20,6))
	as dstArcSec,gcat.*
	from mydb.McCookSion_WDSample as McCookSion_WDSample
	inner join mydb.McCookSion_WDSample_NB as nb
	on McCookSion_WDSample.search_id=nb.search_id
	inner join gcat on nb.matched_id=gcat.casjobsid
Back To Top
|
|
|