


 Follow Us
[Top] [Prev] [Next] [Bottom]
Chapter 3 - StarView
StarView is an astronomical database browser and research analysis tool.
Developed in Java, it provides a user interface that runs on any Java
enabled platform as a standalone application.
StarView is available for
Window, Mac OSX, and most Unix or Unix-like platforms, including Solaris and
Linux. StarView can run on any platform that supports at least JAVA version
1.2.2. For optimal performance, we recommend running it on at least systems
that are: 3.1 Introduction to StarView
3.1.1 What is StarView?
| Unix | Sun Ultra 1 or equivalent with at least 128 Megs of memory |
| Windows | 300 MHz processor running any form of windows (95, 98, NT, 2000, ME?) with at least 64 Megs of memory |
| Mac | Mac OS X 10.0 or later |
| Other Platforms | Must have Java 1.2.2 or later installed |
3.1.3 Installing StarView
Figure 2: Installation Instructions
|
Windows |
After downloading, double-click SVInstall.exe |
|
Mac OS X |
After downloading, double-click SVInstall |
|
Solaris, Linux, generic UNIX |
After downloading open a shell and, cd to the directory where you downloaded the installer. At the prompt type: sh ./SVInstall.bin |
|
Other Platforms (UNIX or Unix like platforms) |
For Java 2, after downloading, type java -jar SVInstall.jar For Java 1.1, after downloading, type jre -cp SVInstall.jar install If that does not work, try java -classpath [path to]classes.zip:SVInstall.jar install If that does not work either, on sh-like shells, try cd [to directory where SVInstall.jar is located]CLASSPATH=SVInstall.jar export CLASSPATH java install Or for csh-like shells, try cd [to directory where SVInstall.jar is located]setenv CLASSPATH SVInstall.jar java install |
StarView has the ability to update itself when new versions are released. When a new version is available, the user will be asked if they wish to upgrade. For site installations, the user will be informed of potential upgrades. If the program will not run, it will exit after the warning. Please contact your administrator to have the upgrade run.
3.1.4 Site Installation
StarView can also be installed globally. The Update feature is disabled for users on a site installation. They will be asked to contact the site administrator.
To do a site installation, download the installer and run as instructed.The StarView.jar files should be not world writeable. Create a file called site_env.dat in the same directory as the StarView.jar file. The administrator can set several default preferences so the user does not need to. These are the mail server used by StarView and the path to a browser startup script (if a wrapper script is used to launch the browser) and the path to the browser binary.
A sample site_env.dat file might contain:
| SMTPHost=poppc.stsci.edu unix.browser.wrapper=/opt/X11R5/bin/netscape unix.browser.bin=/opt/X11R5/lib/X11/netscape/v47/netscape |
Subscribing to starview-update@stsci.edu, a low traffic email list, will keep you informed of upcoming StarView upgrades. Send mail to majordomo[at]stsci.edu and please put the line "subscribe starview-update" in the body of your email message. We will only send out messages prior to upcoming releases to warn you of the upcoming update.
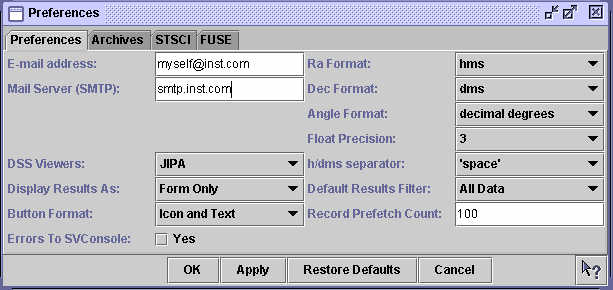
When you start StarView for the first time, you will be
prompted to enter your SMTP server and email address in the Preferences. This
screen is also an item in the Edit menu.
Using the preferences tab you can set your: Preference Tab Table
3.1.5 Preferences
|
E-mail Address |
StarView needs your e-mail address to send mail to the archive when you want to retrieve data. StarView also allows you to send comments to developers and helpdesk personnel. |
|
Mail Server |
To send mail, StarView also needs to know the mail server (or SMTP hostname) you are using. |
| DSS Viewers | JIPA is a simple FITS image viewer. It can display one image and one aperture overlay at a time. If other viewers become available, they will be added here. |
| Display Results | StarView's query results can be displayed as a search form or the form and a single table. |
| Button Format | As a potential space saver, StarView can display its toolbar buttons as Text Only icons, Image only icons, or images with text. |
| Errors to SVConsole | StarView can capture all error messages. Some of these are warning messages, so by default StarView ignores these messages. If you are having problems, by enabling the SV Console, all error messages are captured and can be saved to disk or emailed directly to the developers. Please use this feature only if you are having functionality problems with StarView. |
| RA Format | The choices available for Ra formatting are hms (sexagesimal hours, minutes, seconds), decimal degrees of time, and decimal hours of time. The default is hms. |
| DEC Format | The DEC options are dms (sexagesimal degrees, minutes, and seconds) and decimal degrees. The default is dms. |
| Angle Format | Angle format options are dms (sexagesimal degrees, minutes, seconds) and decimal degrees. The default is dms. |
|
Float Precision |
The float precision determines the floating-point precision options are 2, 3, 4, and 5. The default is 3. |
| h/dms Separator |
The accepted h/dms separators are a space or a colon. The default is a space |
| Default Results Filter | This allows you to limit searches to the science data only. The default is for all data to be searched. |
| Record Prefetch Count | The record prefetch count is the number of records fetched at a time from the database. When a search returns it will return up to 100 matches, with the remaining matches staying on the server until the program requests them (by scanning forward through the data). There is a maximum of 5000 records imposed by the server. The default prefetch count is 100 records. |
The Archives tab allows you choose which archives StarView can use at startup. You may deselect archives that you do not need to reduce load time. Note changes do not go into effect until the program is restarted. If you re-enable an archive, you will have to restart for it to be available.
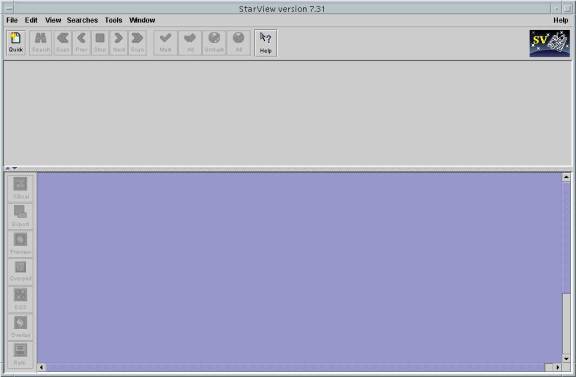
The StarView workspace has
two main sections, the search area and the results area, and is similar to a
web browser in layout.
Figure 4: StarView
The horizontal bar that separates the qualification
workspace from the results workspace is movable if you need more room in either
area. Simply click and hold down the button while dragging the bar to resize
these two spaces. There are quick-click triangles on the left side of the
bar that give you one-touch up and down action to hide the top or bottom areas.
Figure 5: Pull Down Menu
Across the top is the menu bar.
The basic functions of the menus are as follows:
Note that there are keyboard
shortcuts available for most of the actions listed in these menus. For
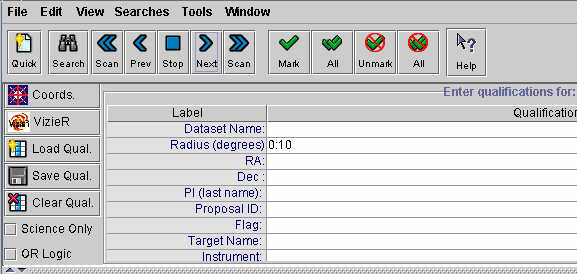
example, to exit StarView from anywhere in the program simply type Control-Q. Once a search form is loaded, the top half of StarView's
workspace will look something like this:
You can type in the qualifiers into the fields at the right
or populate them from another source using the buttons on the left.
The tool bar at the top provides the tools for navigating through the search results. 3.2 Using StarView
3.2.1 Pull down Menus

3.2.2 Search Area
|
|
Quick |
Loads a Quick Search form |
|
|
Search |
Executes the search |
|
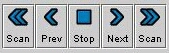
Scan |
Scroll through the list of results either to the first or last result; gets results beyond the initial 100 records. Use single arrows to step one at a time. |
|
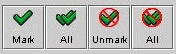
Mark, Unmark |
Marks and unmarks selected datasets for retrieval. Use double-checkmarks to apply to all datasets in results. |
|
|
Help |
Context-sensitive help. Clicking on this and then an object (button, form) will bring up the help browser with the relevant Help entry. |
|
Left hand buttons |
|
|
|
|
Coordinates |
Allows you to use SIMBAD or NED resolver to get target coordinates |
|
|
VizieR |
Find coordinates for objects in the Vizier Catalogs. Search by catalog, mission, type, wavelength range, sky position, and/or keywords. |
|
|
Load Qualifiers |
Load qualifiers from a file (must be in a specific format) see Section 3.5.1 |
|
|
Save Qualifiers |
Saves qualifiers from current search into a specially formatted file see Section 3.5.1. |
|
|
Clear Qualifiers |
Clears all qualifiers from search fields |
|
Science Only |
Searches only the science tables |
|
|
OR Logic |
Joins all qualified fields with OR |
3.2.3 Searches available
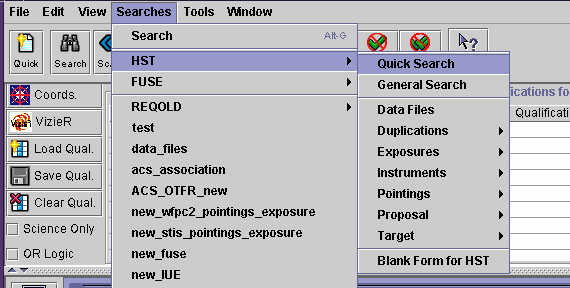
The Searches menu is located in the upper-left portion of your StarView workspace. Note the two dividers in the main pull-down.
The first item is the Search option. Use this menu
choice just as you'd use the Search button in the button toolbar to start
searching. The second section contains
forms for HST and FUSE. You can load these forms, modify them, and save them
locally. Selecting a blank form will create a new search form from
scratch and start the Custom Query Generator, which is discussed in Section
3.7.
The third section lists local forms, forms you have
created or edited and saved to local disk.
Figure 8: StarView Search Forms
These tables briefly describe each search form available as of this writing. Figure 9: HST Search Forms
|
Quick Search |
This is a basic search similar to one on the web. You can also push highlighted results from that search into the Proposals Abstract search, an instrument appropriate Instrument information search or an instrument appropriate Calibration search using the buttons on the screen. |
|
General Search |
Similar to the quick search, it also contains data quality fields. |
|
Data Files |
Especially useful for determining what extensions are available, this search returns dates, file extensions. Often useful in searching and retrieving engineering or reference files by name. |
|
Duplications |
|
|
Duplications Check |
Use to look up planned and executed observations |
|
Duplications Abstract |
Use to look up abstract for planned and executed proposals. |
|
Exposures |
|
|
Exposure Search |
Basic proposal information on an exposure level |
|
Planned Exposure |
Use to search for planned observations. |
|
Pointings |
For each of these instruments we have assembled a searchable data table that allows users to look for sky regions (or pointings) which have been observed N times or more, observed with 2 or more filters, or have been observed more than twice with a time separation of more than (or less than) N days. An exposure is defined to be the file created after the shutter closes. The total number of exposures for each of the defined bands within a defined pointing was tallied. |
|
Search for sky regions
(pointings) which have been observed N times or more, observed with 2 or more
filters, or have been observed more than twice with a time separation of more
than (or less than) N days.
| |
|
Pointings Exposures (ACS, NICMOS, STIS, WFPC2, FOC) |
Search for the individual exposure making up a pointing |
|
Proposal |
|
|
Proposal |
Use to search for proposal titles, cycles, types, PIs, etc. |
|
| |
|
Target |
|
|
Fixed Target |
Use to search for target related information in the HST catalog. |
|
Solar System Target |
Use to search target related information on solar system targets |
|
Instruments |
|
|
Association (ACS, STIS, NICMOS) |
Use to search for information on the members that make up an association. |
|
Calibration (ACS, STIS, NICMOS, WFPC2, FOC, FOS, GHRS, HSP, WFPC) |
Use to search for information on files used to calibrate data. |
|
FGS Astrometry and Instrument (ACS, STIS, NICMOS, WFPC2, FOC, FOS, GHRS, HSP, WFPC) |
For instrument-specific exposure information, like special configurations, operating modes, etc. |
|
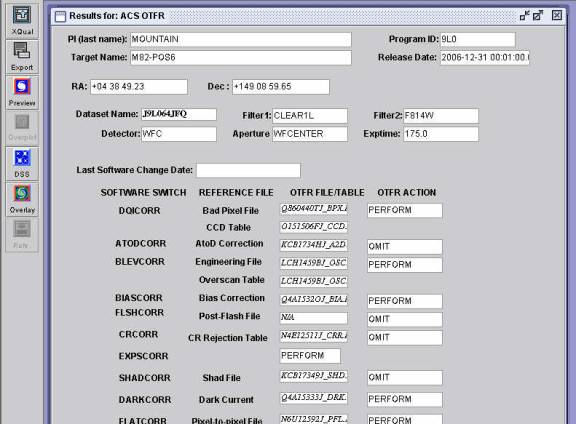
OTFR (ACS, STIS, WFPC2) |
Use to view files and switches used in OTFR. Please note that these are not always up to date |
|
Reference (STIS, NICMOS, WFPC2, FOC, FOS, GHRS, HSP, WFPC) |
Use to view files used in calibration. |
|
FUSE |
This is a basic search for FUSE data |
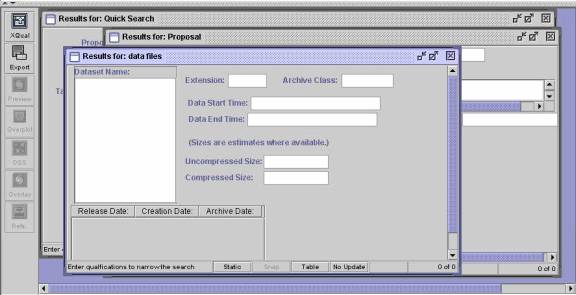
3.2.4 Results Workspace
The result forms are displayed in the bottom half of your StarView. Multiple forms can be shown in this area. To bring a form to focus, click on its title bar within the results workspace or select it from the Window menu.
Figure 11: Search Results workspace with several forms loaded
At the bottom of every form is a text area where the search
status is reported, four toggle buttons and a record count status.
Figure 12: Search Status bar
Clicking on the Static/Edit button will allow the form to be
edited, fields added and moved around (see Section 3.7.2).
When it is in edit mode, the button will read
Edit. The Snap is not in use.
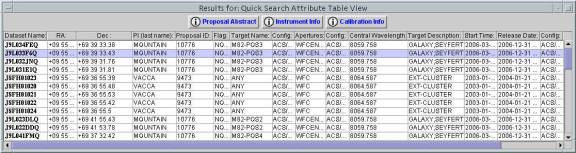
The Table button displays the current records
in a table popup containing all of the fields listed on the form.
Figure 13: Results in Table Format
The NoUpdate/Update button determines whether the results
are updated with each record when scanning quickly through records. The record count status displays the number of the record
you currently have selected.
If there is not a final count displayed ("95 of ...") that means there are
more records to be retrieved.
The default is to return the first 100 records at a time.
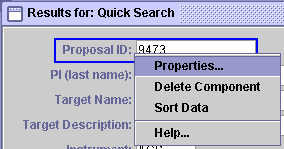
To get the rest, simply scan until all records are retrieved. You can sort the results by
any available field by right-clicking the label and selecting Sort Data
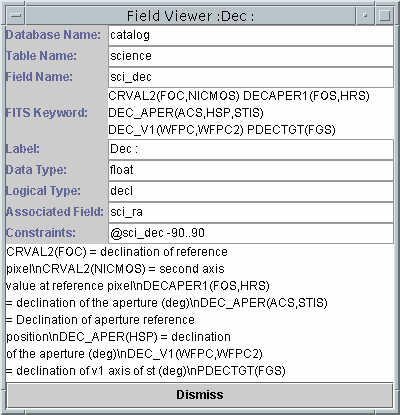
from the menu. You can also get more
information on the database field by selecting the Help option.
You can also retrieve this information by
clicking the Info button
Figure 14: Field Information window
![]()
![]() in the Get Field column in the Qualifiers section of the interface.
in the Get Field column in the Qualifiers section of the interface.

|
Cross Qualification This button is used to take the results of one search and use them as the qualifications for another. These results can be either from an active screen or from search results saved to disk. A detailed explanation can be found in Section 3.5 |

|
Export This button will save the results of the current query to disk. A detailed description can be found in Section 3.5. |
|
|
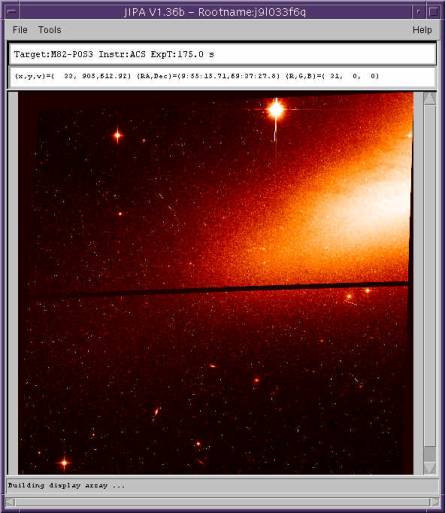
Preview This button allows you to load preview images or spectra into a viewer. The
default image viewer is JIPA .The viewer for spectra is SpecView. (http://www.stsci.edu/resources/software_hardware/specview
)
Overplot plots the preview spectrum of the current selected dataset over previously previewed spectra. |

|
DSS and Overlay This allows the user to view the Digital Sky Survey image surrounding the coordinate of the currently selected record. By default, JIPA will be used to display DSS images. Overlay adds the apertures of the instruments as they were during the observation to the DSS image. |
|
|
Refs. This button will direct a web browser to a page linking to all known references in the literature to data from the project that includes this dataset. |
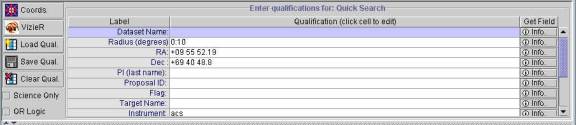
You can refine your search by entering qualifications into
the Qualification column of the table above the search form. If you wish to get
more information about a particular field, simply click on its Info button at
the far right.
There are several valid operators available in StarView. All qualifiers can be entered using free-form text except
for radius, RA, Dec, and datetime. Here are the most popular database
fields from the Hubble Data Archive at STScI and their expected formats. Figure 18: Data Types
3.2.6 Qualifiers
Qualifying Operators
Qualifier Data Types
| Logical Type | Data Type | Example |
|---|---|---|
| datasetname | varchar | U4WOEM02R |
| radius | float | 0:10 |
| ra | float | +10:45:04 |
| decl | float | -59:41:04 |
| instrument | char | STIS |
| pepid | int | 4255 |
| datetime | datetime | 1995-01-01 02:14:50.0 |
| lastname | varchar | DOXSEY |
| targetname | varchar | NGC3532-209 |
| wild-text | varchar | 512X1024 |
Valid Datetime Formats
In StarView there are many acceptable formats to use when qualifying on dates. The default format is YYYY-MM-DD
In all cases, a year can be represented as two or four digits: 00 or 2000
The year, month and day are sufficient in any format to encompass the entire 24-hour period: 2001-08-17 or Aug 17 2001
If you'd like a range of days, use the range operator with your favorite format: 2001-03-23..2001-03-25.
Greater than and less than are also acceptable in each format: >1999-02-13 or >Feb 13, 1999
Examples:
1999-01-23 12:00:00.000 AM
01/23/1999 12:00:00.00 AM
Jan-23-1999 12:00:00.000 AM
Jan 23, 1999 12:00:00.000 AM - also acceptable without comma
23 Jan, 1999 12:00:00.000 AM - also acceptable without comma
23-Jan-1999 12:00:00.000 AM
NOT Valid:
01-23-99
Valid Coordinate Formats
Figure 19: Valid Coordinate formats
| R.A. | Dec. |
|---|---|
| 05:34:56.31 | -05:21:37.29 |
| 05 34 56.31 | -05 21 37.29 |
| 05h34m56.31s | -05d21m37.29s |
| 05h34m56s.31 | -05h21m37s.29 |
| If the coordinate format in Preferences (3.1.5) has been set to decimal degrees: | |
| 83.734625 | -5.360358333333333 |
Once you have found the data you are looking for, you can mark the data you wish to retrieve using the
To mark multiple datasets, click on them while holding down
the Control key, and then use the Mark button. Right-clicking the dataset name and selecting "Fetch
Entry" from the menu will also select the dataset for retrieval. Figure 20: Right-click menu on dataset name
Selecting data for retrieval brings up a retrieval window
that acts as a shopping cart.
in the list are will be added as "marked."
If the data is proprietary, you will be alerted that the
data is proprietary when you mark it, and you will need authorization to
retrieve it if you haven't done so already.
To be authorized, contact archive@stsci.edu
with the program id and your archive account id.
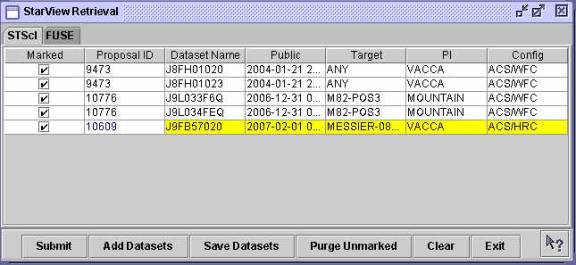
Proprietary data is highlighted in yellow in the Retrieval List. When you submit a request, the datasets will be unmarked in
the retrieval window, but not removed. You can get to the retrieval window by selecting a dataset
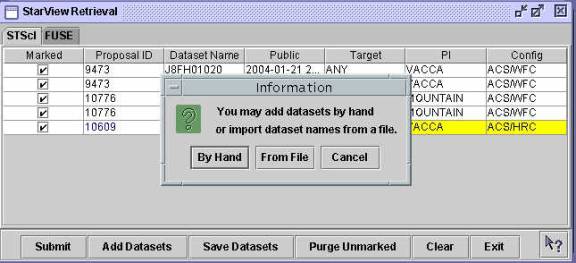
for retrieval or by selecting Retrieval from the View menu. You can also load datasets by name or from an external file
of dataset names. Selecting the Add Datasets option (at the bottom of the
Retrieval List screen) will bring up a dialog window prompting you to enter
datasets either by hand or from a file. If you select By Hand, you get a text field entry box.
Once you have entered the dataset and
pressed OK, the dataset will be added to the retrieval screen. If you select From A File, you will be presented with a
standard file selector tool. Select the file that contains the list of datasets
you wish to load. The format of this file should be a single dataset
listed on each line of the file. Once selected, the contents of this file are
parsed and the datasets are verified and added to the table.
You can also take the datasets in your retrieval list and save them to an external file.
You can save all of them, or just the ones that are marked.
These can be uploaded at another time using Add Datasets. Purge Unmarked will delete all unmarked datasets from the list.
Clear will remove everything from the list. Once you have finalized your list, press Submit.
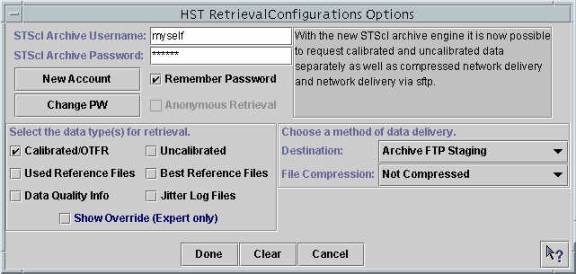
In the Retrieval Configuration Options window, you enter
your archive user name and password, destination information and file
selection. If you are retrieving public data, you can use the anonymous
retrieval method. This uses anonymous
as the user id and your email as the password. You can also change your password, or request a new
account. Please be aware that if you are retrieving proprietary data, you must have an account,
and it must be authorized to retrieve the proprietary data.
Please contact archive@stsci.edu
with those requests. You can have StarView remember your password by selecting
the Remember Password checkbox. It will
be encrypted and saved to your preferences.
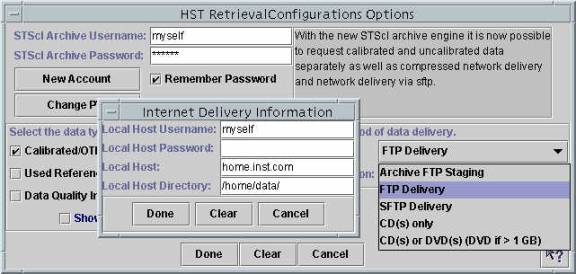
You can chose to have your data delivered via ftp, sftp,
placed on the staging area or, in the case of HST only, written to CD or
DVD. FUSE data cannot be retrieved to hard media. You can also choose to have the data gzipped. If you chose ftp or sftp, you will be prompted to provide
the user name, user password, host name, and directory to which you want data.
This information is encrypted in the submission and the password is not stored
in the user preferences.
Figure 24: Sftp or ftp destination information
If you chose archive staging (Archive ftp staging), a
directory on archive.stsci.edu will be created and the data deposited
there. To retrieve your data, ftp to
archive.stsci.edu using your username and password.
The data will be in the directory /stage/[userid]/[requestid] For large requests, please contact archive@stsci.edu for alternate delivery
options.3.3 Retrievals
![]() Mark button for individual datasets, or the
Mark button for individual datasets, or the
![]() Mark All to retrieve all the records returned by the search.
Mark All to retrieve all the records returned by the search.

3.3.1 Retrieval List Window

Add Datasets
Save Datasets
Purge Unmarked and Clear
Submitting a Request
3.3.2 Retrieval Options
3.3.2.1 Account information
3.3.2.2 Destination
|
Calibrated |
Archived version of calibrated science data for non-OTFR instruments and OTFR data for OTFR instruments |
|
Uncalibrated |
Raw science data. For OTFR, the "raw" FITS files are generated from telemetry. |
|
Data Quality |
Reports describing science data quality. |
|
Jitter Info |
Jitter and pointing data files. |
|
Best Reference Files |
For data retrieved through OTFR Best and Used are identical. |
|
Used Reference Files |
For non-OTFR data, these are the files that were used to generate the existing Calibrated dataset in the archive. |
Figure 26: Files Delivered for each File Option Checkbox
| Instrument | Modes | Caption | Uncalibrated | Data Quality | Jitter Logs |
|---|---|---|---|---|---|
| ACS | possible files | ASN, CRJ, DRZ, FLT, SFL, SPT, TRL | ASN, LRC, LSP, RAW, SPT, TRL | PDQ | JIF, JIT |
| modes actual files | |||||
| WFPC2 | possible files | ASN, C0F, C1F, C2F. C3F, C3T, SHF, TRL ,X0F | ASN, D0F, Q0F, Q1F, SHF, TRL, X0F | PDQ | JIF, JIT |
| modes actual files | |||||
| STIS | possible files | ASN, CRJ, FLT, SFL, SX1, SX2, TRL, X1D, X2D | ASN, LRC, LSP, RAW, SPT, TAG, TRL, WAV, WSP | PDQ | JIF, JIT |
| modes actual files | |||||
| NICMOS | possible files | ASC, ASN, CAL, CLB, CLF, IMA, MOS, SAA, SPB, SPF, SPT, TRL | ASN, RAW, RWB, RWF, SAA, SPB, SPF, SPT, TRL | PDQ | JIF, JIT |
| modes actual files | |||||
| GHRS | possible files | C0F, C1F, C2F, C3F, C4F, C5F, CQF, TRL | D0F, D1F, Q0F, Q1F, SHF, TRL, ULF, X0F, XQF | PDQ | JIF, JIT |
| modes actual files | |||||
| FOS | possible files | C0F, C1F, C2F, C3F, C4F, C5F, C6F, C7F, C8F, CQF, SHF, TRL | D0F, D1F, POA, Q0F, Q1F, SHF, TRL, ULF, X0F, XQF | PDQ | JIF, JIT |
| modes actual files | |||||
| FOC | possible files | C0F, C1F, Q0F, SHF, TRL, ULF | D0F, Q0F, SHF, TRL, ULF | PDQ | JIF, JIT |
| modes actual files | |||||
| WFPC | possible files | C0F, C1F, C2F, C3F, SHF, TRL, X0F | D0F, Q0F, Q1F, SHF, TRL, X0F | PDQ | JIF, JIT |
| modes actual files | |||||
| FGS | possible files | A1F, A2F, A3F, DMF, TRL | PDQ | JIF, JIT |
FUSE
The following options are available for retrieving FUSE science data:
Figure 27: FUSE Retrieval File Options
|
Minimum Recommended |
Default selection of calibrated observation files plus pipeline processing logs. (This retrieves just 12 calibrated files (rootname "*fcal") per exposure - 8 for each detector/side, and 4 trailer files (trailer files are the logs of the pipeline processing history of the observation), irrespective of the TTAG or HIST observing mode. The files in this package are only those unique to a given observation. Quick-look gif files are not included in this package. It is important to note that for most (TTAG) observations files are returned for all three spectral entrance apertures, even though only one is normally used. For HIST observations only the target aperture admits light and therefore only one set of aperture files is generated (see the FUSE Instrument and Data Handbook, Section 3.2: Spectral Image (HIST) Mode) |
| Calibrated | Calibrated exposure files. |
| Observed | Calibrated observation files. |
| Raw Exposure | Raw exposure files. |
| Previews | A set of gif files used in the FUSE previews |
Show Override Options (Expert)
Figure 28: Show Override Retrieval Configuration page
This allows you to enter the specific file extension.
For HST, this is a 3-character extension
(You can look up available extensions for a dataset using the Data Files search
form). If you wish to retrieve just the extensions,
be sure to check "Fetch only listed extensions" or you
will also be retrieving anything you may have checked in the Data Types section. For FUSE, information on the FUSE file naming conventions
and contents see the table in Data Handbook, Section
4.1: Data Filenames (http://fuse.pha.jhu.edu/analysis/IDH/IDH.html#DataFilenames).
The project defines "rootname" with 11 characters through the
exposure number (3 characters). As defined, this name not includes the detector
number & side (1a, 1b, 2a, 2b), observing mode, and data product type. When you press Done, StarView verifies the information you
have provided. If any of the information provided is incomplete
or cannot be verified at the time of submission, you will be alerted to make the necessary changes.
Reference files can be retrieved through a couple different
methods. When you are retrieving
science data, the "Used" or "Best" reference file
checkboxes on the retrieval options page will provide the relevant data.
You can also retrieve
reference files independent of the science data with which they are
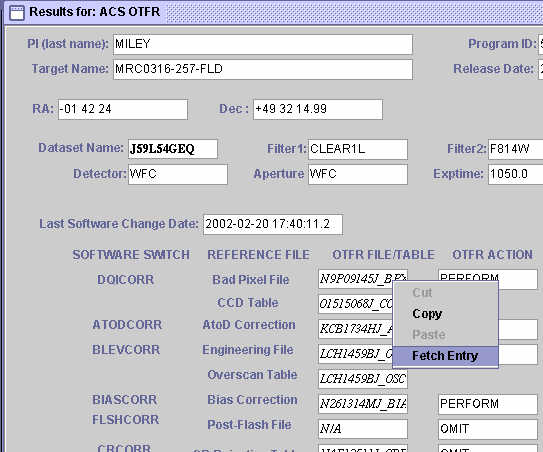
associated. On the Calibration and
OTFR forms, the reference files are displayed.
If you right-click the file name, you will be presented with a menu
where one of the options is "Fetch Entry". This will place that
reference file in the Retrieval list.
Figure 29: Retrieving a reference file from results
If you already know the name of the dataset, you can simply
use the "Add Datasets" option on the Retrieval list.
If you need to verify the data exists, and
perhaps look up what its extension is, use the Data Files search form to look
up that information and then mark it for retrieval. Once you've reached the Retrieval Configurations screen, you
will need to select the Show Override option and enter the dataset's
extension. If the dataset was listed as
IPPPSSOOT_XXX.FITS, the extension is the XXX portion of the name.
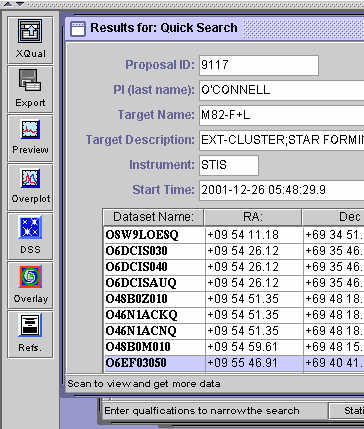
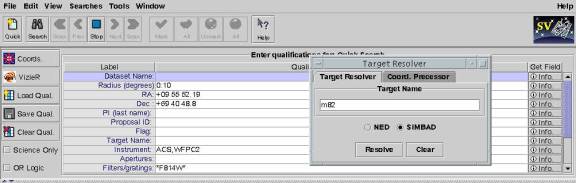
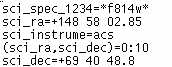
Suppose you want to find what observations were made by ACS
or WFPC2 of M82, in the F814W filter and retrieve some to the archive staging
area. First, load a quick search. To get the coordinates, select Coords
This loads the coordinates into the search fields for RA and Dec. Figure 30: Quick Search, fields entered
Next, designate the instruments as WFPC2, ACS and the filter as F814W.
Since you are searching for ACS data as well, it is important to wildcard the filter fields. Hit Search
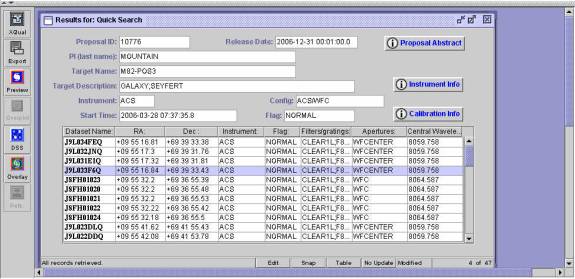
To retrieve all records, use the scan buttons
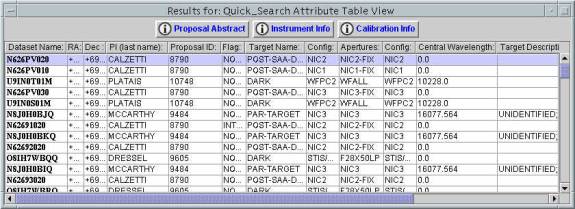
Figure 31: Quick Search Results
You can also display the results in a table: Figure 32 Quick Search Results Table
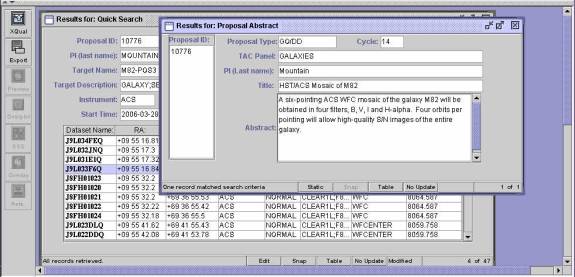
The Proposal Abstract, Instrument Info and Calibration Info
buttons will launch searches using just the datasets selected in the Search
Result form or table. Use them to quickly get more information than is
available on the Quick Search form. Figure 33: Search Results with Abstract Search shown For this search, all potential previews are images, so the
Figure 34: Preview Image
If there are papers that have
been linked to the data, clicking on the References
The DSS button will open up an image from the Digitized Sky
Survey in the preferred image browser. Figure 35: DSS Image Select data you would like to retrieve using either the mark
buttons at the top, or by right clicking on the dataset name and selecting
Fetch Entry or Mark Datasets. You can also use control-M on a highlighted dataset.
Figure 36: Marking data for retrieval
In the Retrieval list, marked data is indicated by the check
in the left column. Hit Submit. On the retrieval options page, type in your archive username
and password. If you don't have an
account, you can click the New Account button to get one.
You must have an authorized account to retrieve
proprietary data; however, public data can be retrieved using anonymous as the
user id and your email address as the password. Select Archive FTP Staging as the destination and Not
Compressed for the Compression option. For the type of data requested, the default is the OTFR
/Calibrated option. To retrieve the raw
data as well, select Uncalibrated in addition to the Calibrated/OTFR option. Figure 37: Retrieval Options When all options are set, hit Done to complete.
StarView will verify the supplied parameters and respond with a request id. When your request is complete, an email will be sent
detailing the location of the data and how to retrieve it. You can also save the search parameters to a file that can
later be uploaded into another search form.
After entering qualifiers, use the Save Qualifiers
Figure 38: Saved Qualifications
To upload saved search parameters, use the Load Qualifiers
If you want to save the
results of your search to a file, you can use the Export button
Figure 39: Export Results to File
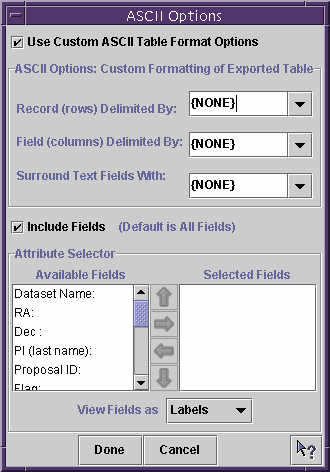
You can also save the file in other formats by selecting Format, above the Save and Cancel options. Figure 40: Format Options
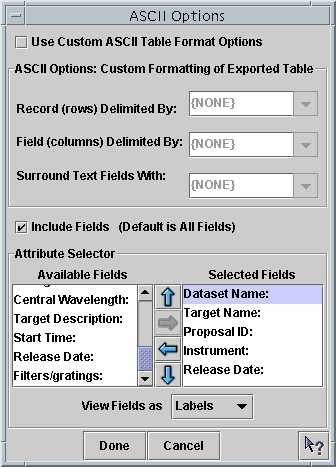
On the Format screen, check the "Use Custom ASCII Table
Format Options" checkbox to change the delimiters between records and
fields. You can also have text fields surrounded by the same delimiters. Table 2: Delimiters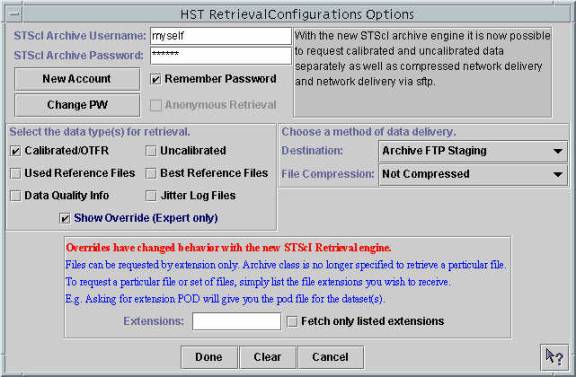
3.3.3 Reference File Retrieval
3.4 A Simple Search using Quick Search
![]() and enter M82.
and enter M82.
Press Resolve.
![]()
![]() button reflects this. If spectra were available, it would look like
button reflects this. If spectra were available, it would look like

![]() button will open a listing in a browser.
button will open a listing in a browser.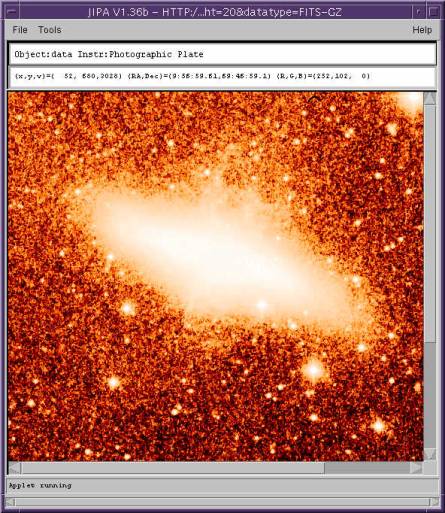
3.5 - Saving and Refining a Search
3.5.1 - Saving and Uploading
![]() button to save the search parameters to a file.
It writes the qualifiers to a file in a format that can be
uploaded directly to a StarView search using the Load Qualifiers button
button to save the search parameters to a file.
It writes the qualifiers to a file in a format that can be
uploaded directly to a StarView search using the Load Qualifiers button
![]()
![]() button. This will allow you to load
qualifiers from a local file to the form currently in focus.
StarView will place the parameters in the
proper fields, when available. If a
field isn't available, StarView will let you know.
button. This will allow you to load
qualifiers from a local file to the form currently in focus.
StarView will place the parameters in the
proper fields, when available. If a
field isn't available, StarView will let you know.
3.5.2 Exporting Results
The default format is a tab-delineated file with one record per row.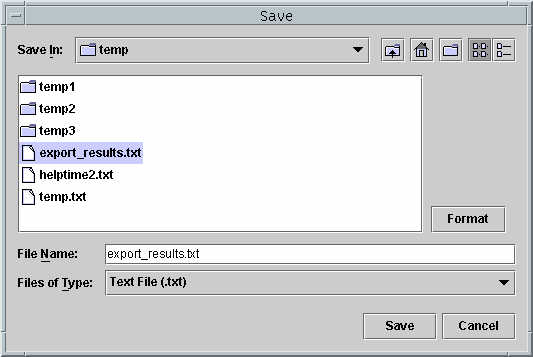
| None |
| space |
| tab |
| carriage return |
| & |
| && |
| , |
| ; |
| " (double quote) |
| ' (single quote) |
The default is for records to be separated by a carriage return, fields by a tab, and nothing surrounding the text fields.
If you click on the "Include Fields" checkbox, you can arrange to save only selected fields. The default is all fields displayed on the form. The "View Fields As" checkbox allows you to display either the database fieldname or the form label in the Available fields column.
Double click on a fieldname listed in the Available Fields column or select it and use the right arrow to move it into the Selected Fields column. You can use the left arrow to remove a field and the up and down arrows to arrange the order.
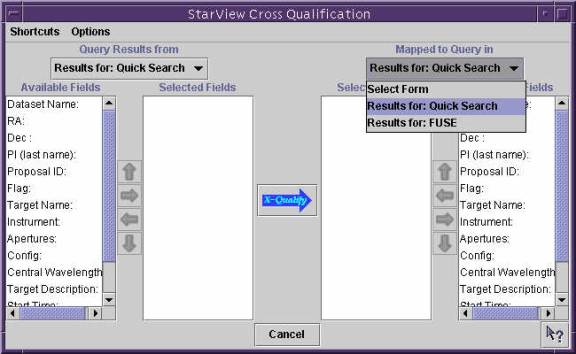
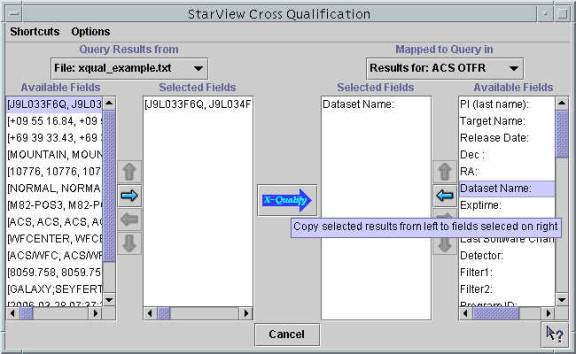
You can also take the results of one search and insert them as qualifiers in another using Cross Qualification
Figure 41 Cross Qualification Screen
The column on the left corresponds to the source of the
qualifiers, whether a search form or a file of saved results.
The column on the right corresponds to the
destination of the cross qualification, the form to which the qualifiers will
be imported. You can change the source and destination forms from the drop down
menus. You need to do this before selecting any fields. If you select the
source "From a file", a file
selection menu will appear.
The file needs to be a tab separated listing of results, with each new row a list of
results from a given field. Loading the file will display the field data in the
"Available Fields" column. Figure 42: File of results to be imported into Cross Qualification Once you have selected the source and destination, you can
select the fields in each for cross qualification.
To select a field, click on the field in the "Available
Fields" column and then on the arrow pointing to the right.
Double clicking the field will also add it
to the "Selected Fields column."
You can change the order of the fields using the up and down
arrows. The order of the source's fields needs to match the order of the destination's.
Once you've selected all the
fields, click the X-Qualify button
Figure 43: XQual Results
If you wish to save the text of the query used in a search,
select Save SQL from the file menu.
Suppose you wanted to export the results of a simple query
and then later look up OTFR information on those
results.
First, load the Quick Search and get the coordinates for M82 using the Target Resolver.
Designate the instrument qualifier as ACS
and the Filter as"*F814W*" and search.
Figure 44: Search Results
To save the results, you will need to export them.
Select the export button. If you don't want to export every field listed on the
screen, choose Format in the file chooser before proceeding.
On the format screen, select the fields you wish to
save.
If you wish to re-use these results in StarView at a later date (as in this example,)
leave the "Use Custom ASCII Table Format Option" unchecked.
Check the "Include Fields" box and select the fields you wish to export, by either double-clicking
them or selecting them on the left and using the arrow to push them into the box on the right.
In this example, the chosen fields are Dataset Name, Target Name, Proposal ID, Instrument and Release Date.
Figure 45: Choosing fields to be exported to a file
When complete, press Done and you will be returned to the file
chooser. Give the file a name and save it.
Here we will call it export_results.txt.
Please note that if you intend to import the results later using
cross qualification, you will need to edit the file to 50 lines or less.
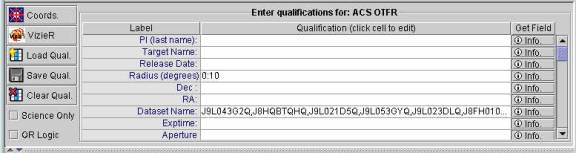
To view OTFR information about the results, you will need to use Cross Qualification.
First, bring up the ACS OTFR Search.
This will give you information on the ACS datasets saved earlier.
If you still have the Quick Search with the results available,
you could Cross Qualify from that form to the ACS OTFR form.
In this example, we'll use the results exported to export_results.txt. Push theX-Qual button
Under "Query Results from:" choose "A File" and select the exported results file from
earlier, export_results.txt. Under "Mapped to Query", select the ACS OTFR search. Figure 46: Cross Qualify from a file
The first line in Available Fields in the "From"
section is the dataset name.
Double click on that line to push it to the list of selected fields.
Under "Mapped to" find "Dataset Name" in the list of available
fields and double click on it. Press the X-Qualify arrow.
The names of the datasets have been pushed into the dataset name qualifying field on the ACS OTFR form. Figure 47: Cross Qualification
Now select search to view results.
If you have more than 50 qualifiers, there will be an error.
You will need to edit your file or the list in the qualifying screen to have less than 50. Figure 48: ACS OTFR Search results
You can also save the sql used in the query to a text file.
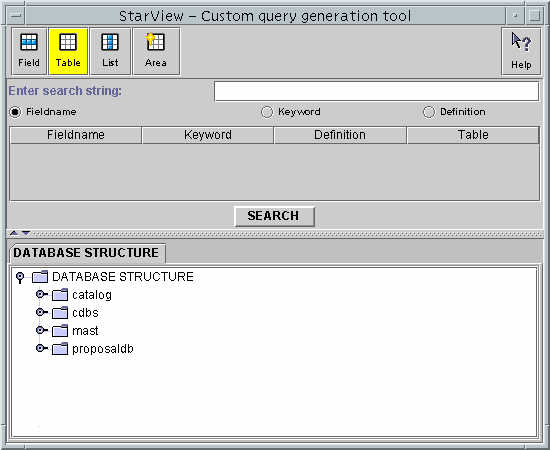
This might be useful if you needed to know all the database names of the fields to construct custom searches. The Custom Query Generation Tool is a database browser that is used to create and modify search forms.
It allows you to add fields from the available MAST databases. To create a completely new search from scratch, select a blank form from the Searches menu.
This will start up the database browser.
To edit an existing form, load the form and click on the button reading Static.
It will change to Edit.
You can then start the tool by selecting Custom Query Generator from the View menu. Figure 49: Custom Query Generator
The Custom Query Generator Tool has three main sections. The buttons across the top allow you to choose how the field contents will be displayed. Figure 50: Field component
Figure 51: Table component
Figure 52: List Component
Figure 53: Area Component
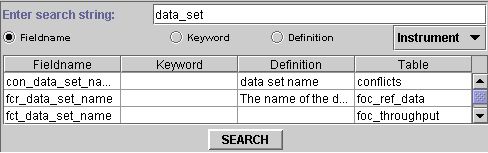
The middle portion of the Tool is the search section.
You can search all the available databases for relevant fields based on their name, keywords or definition.
Figure 54: Search by string
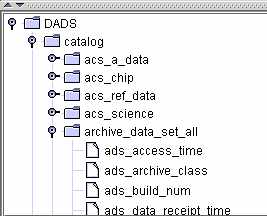
The bottom portion is a visual tree of the database hierarchy.
The default shows only the databases available. Left clicking an item will expand it.
Right clicking any item will produce a popup menu with more options for that
item. Expanding a database will reveal the tables for that database. From
there, you can expand a table into its fields. An item with a white document
icon to its left is a field. Left clicking any field will add it to the current
form.
Right clicking will produce a popup menu that allows you to add the field or
get more information about the field. Figure 55: Database tree
To add fields, the form must first be in Edit mode.
This is done by toggling the Static button at the bottom of the form to Edit.
Clicking on a fieldname, either from the database tree or the results of the string search will add it to the
search form. There are tables for which joins don't exist.
This usually results in an SQL error.
If you need help constructing a form, please contact
< archive@stsci.edu
You can save new or modified forms using the options under the File menu.
You will be prompted before closing a modified form to save it.
To format or delete a field in a form, right click on the field label Figure 56: Field Edit Menu
Properties allows you to change the field
label, the size of the label and the size of the display box.
Figure 57: Properties
Delete Component will remove the field from the form. Sort and Help work as they do in Static mode. 3.5.3 - Cross Qualification
.
The values can be from the results of a
search you just performed or the contents of a file saved.
![]() This will port the results from the source
into the destination search form, and bring it into focus.
Click Search.
This will port the results from the source
into the destination search form, and bring it into focus.
Click Search.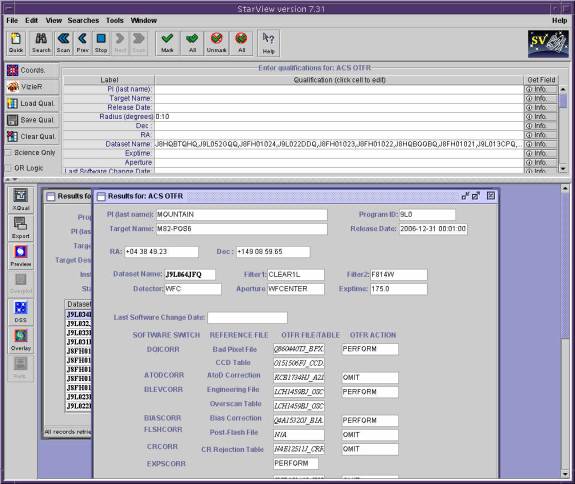
3.5.4 Saving the SQL Query
3.6 More Complex Example

 Cross Qualify in the Tools menu.
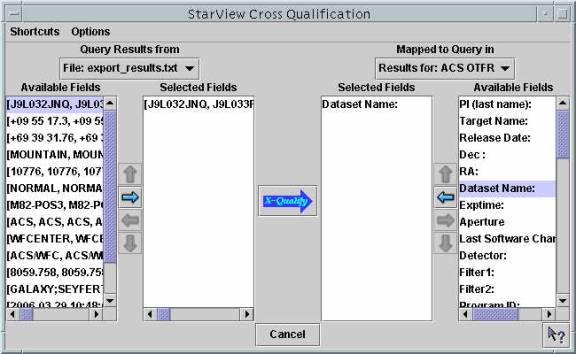
3.7 Building a New Search or Modifying an Existing Search
3.7.1 Custom Query Generator Tool
 The field component is a simple text box that displays one record at a time.
![]()
 The Table component is a two dimensional table of one or more fields, displaying multiple records at one time.
Fields will be added to the table selected on the form.
If no table is selected, a new table will be created.
Fields selected will be added to that table until it is deselected on the form.
The Table component is a two dimensional table of one or more fields, displaying multiple records at one time.
Fields will be added to the table selected on the form.
If no table is selected, a new table will be created.
Fields selected will be added to that table until it is deselected on the form.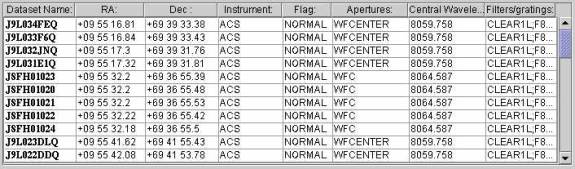
 The List component displays multiple records for a single field.
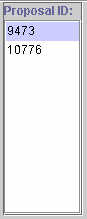 The Area component is simply a multi-line text box.
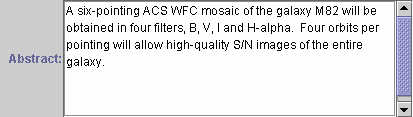
3.7.2 Adding fields to an existing form
3.7.3 Manipulating fields

[Top]
[Prev]
[Next]
[Bottom]
|
|
|