Another complication emerged: we found that the positioning of the blotches in the CCD's reference frame changed with time. From the smoothness of the changes and repeatability from one orbit to the next (when viewing a particular star), it seemed clear that Earth's magnetic field was perturbing the trajectories of the electrons in their flight from the photocathode to the CCD. The maximum range of this motion was ±5 pixels in our data reduction format, i.e., ±75µm on the surface of the CCD. Fortunately, the offset was the same everywhere (i.e., there was only a pure translation with no changing distortion). Even with this simplification, however, it was still necessary to have the offsets measured for each individual image so that the sensitivity template image could be positioned properly before the division was done.
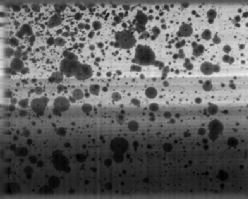
| Figure 7: Final flat field correction template: A modified version of the picture shown in Fig. 6 that has been corrected for the uneven illumination of the spectra. |
 |
We have no test exposures where the photocathode was illuminated
uniformly. Thus, in creating the sensitivity template we had to add
together all spectral exposures, with appropriate translations and
zero-level corrections, with the working assumption that many
differerent spectra with an arbitrary mix of offsets and spectral ranges
from different sources were nearly equivalent to a uniform exposure
everywhere. Fig. 6 shows that, from the standpoint of
accurately representing the blotches, this assumption seems to be
correct. However, some streaks created by the echelle orders can be
seen, despite the fact that they were piled on top of each other in a
nearly random fashion. Also, gradients in intensity of the actual
pictures result from the echelle blaze function (left to right) and the
drop in the optical efficiency for ![]() Å (top to bottom).
Å (top to bottom).
The CCD has a small sliver at the edge of the format that is unthinned. This region responds to visible light but not to photoelectrons. We were able to use the levels recorded in this area to define a correct zero level for ultraviolet illumination, which in turn insured that our adopted sensitivity pattern had no spurious level offset.
To take out the gradients and streaks in Fig. 6, we distorted
it so that all of the streaks were horizontal![]() , divided each row by its best-fit
third-order polynomial, and then performed the inverse of the original
distortion. The result is shown in Fig. 7. This picture was
the one adopted for all corrections of the individual spectral images.
The vertical striations at the bottom of the picture are an artifact of
our filtering scheme for electronic noise (§7.2). The
attenuation of some of the energy at intermediate x frequencies (at
zero y frequency) caused by the blotches created a rebound that
introduced some faint vertical bands. They are barely discernable in
Fig. 6, but they are strong in the bottom of
Fig. 7
because this part of the picture has been amplified considerably to make
it as bright as the top portion of the image. These striations are of
no consequence in our correction procedure, because they are balanced
out nearly perfectly by identical ones in the spectral images that were
subjected to the same filtering of electrical noise.
, divided each row by its best-fit
third-order polynomial, and then performed the inverse of the original
distortion. The result is shown in Fig. 7. This picture was
the one adopted for all corrections of the individual spectral images.
The vertical striations at the bottom of the picture are an artifact of
our filtering scheme for electronic noise (§7.2). The
attenuation of some of the energy at intermediate x frequencies (at
zero y frequency) caused by the blotches created a rebound that
introduced some faint vertical bands. They are barely discernable in
Fig. 6, but they are strong in the bottom of
Fig. 7
because this part of the picture has been amplified considerably to make
it as bright as the top portion of the image. These striations are of
no consequence in our correction procedure, because they are balanced
out nearly perfectly by identical ones in the spectral images that were
subjected to the same filtering of electrical noise.
For individual spectral images, we determined the zero levels (and their
gradients in x and y, if present) and the coordinate offsets by
trial and error. After invoking trial corrections, any errors in
background result in white blotches (assumed background level too small)
or black ones (assumed background too large). When the translational
offsets are wrong, the correction produces a pattern that resembles
craters on the moon. This effect can be apparent for errors in the
shift as small as a few tenths of a pixel. Our direct trial method of
measuring the shifts seemed to be much more effective than attempts to
define the center of a cross correlation peak between the image and the
template.
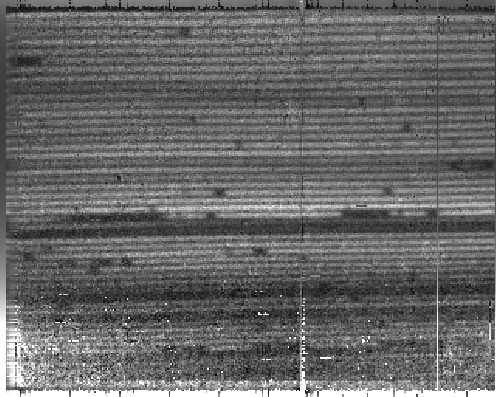
| Figure 8: The appearance of an image after processing to remove the electrical interference (§7.2), the dark current pattern (§7.3), and variations in photocathode sensitivity (§7.5). This exposure is the same as that shown in Fig. 4. The bottom and left-hand portions of the picture have been enhanced to take out the natural sensitivity gradients produced by the echelle blaze function and the loss of sensitivity below 1000Å. One can notice that the picture is slightly noisier in the locations where there were photocathode blotches, as is to be expected from the lower quantum efficiency. In the lower left and lower right corners, there is fogging produced by some scattered visible light that entered the instrument (this picture was taken during a daylight portion of the orbit). The enhancement of the bottom part of the picture exaggerates this effect (compare with Fig. 4). |
 |