CasJobs is an online tool used to query large databases. Originally created for the SDSS catalog, it has now been adapted for selected MAST archival datasets - namely GALEX, Kepler and the HSC. While the MAST Discovery Portal is the primary tool for using the HSC, CasJobs provides a powerful tool for looking at larger datasets and making more detailed queries. The HSC Homepage is also available for some specific queries.
GOAL: This tutorial provides a first look at how to use CasJobs to query the Hubble Source Catalog. For a more detailed tutorial on the syntax behind the queries the SDSS SQL Tutorial is recommended.
SCIENCE CASES: The science cases are studies of: 1. slightly extended objects (i.e., globular clusters in M87) and 2. large datasets (i.e., a Color Magntiude Diagram for the SMC).
| Step 1 - Enter the HSC Casjobs webpage and create an account using the button in the top menu bar (blue). Go ahead and login (green). |  |
|
Step 2 - Inspect the HSC databases and functions. Click MyDB in the top menu bar (blue). This displays all the tables and functions you create in "MyDB" (My Database). Now change the "context" (the database used to run your query) from MyDB to HSCv3 (i.e., Hubble Source Catalog Version 3) (green), using the dropdown menu on the top left. This shows the available views, tables, functions and procedures related to the HSC database. For example, click Tables (green), and then select SumMagAper2Cat (i.e., the HSC Summary Form using magaper2 magnitudes) (orange). Scroll across to see the fields located in this table, such as Match ID (yellow), the instrument and filter used (i.e., W2_F122M is the magaper2 magnitude using the Wide Field Planetary Camera 2 image and the F122M filter) (yellow). A description of the table and some of the columns are provided. You might want to examine the Function SearchSumCatalog also, since you will be using it in a minute. |

|
Step 3 - Query the database. The query below is designed to find globular clusters in the galaxy M87.
SELECT
      MatchRA, MatchDEC, MatchID, CI, W2_F606W, W2_F814W, V_I=W2_F606W - W2_F814W
FROM
      SearchSumCatalog(187.706, 12.391, 500.0, 1)
WHERE CI > 1.05 and CI < 1.5
      and (W2_F606W - W2_F814W) > 0.0 and (W2_F606W - W2_F814W) < 1.0
      and numimages > 50
ORDER BY matchID
The SELECT command defines the columns to include in the output table (such as the RA, DEC, ID, Concentration Index, and magnitudes).
The FROM command defines the query itself, and is composed of the following parts:
a) The HSC function SearchSumCatalog, which is used to search the HSC around the position of M87 (187.706, 12.391) with a specified search radius (500 arcsec), and retrieve the magaper2 (magtype = 1, i.e., aperture magnitudes within a 3 pixel = 0.30 arcsec radius).
b) The WHERE clause defines the search parameters
i) concentration index (CI = difference between magnitudes for apertures with a radius of 0.10 and 0.30 arcsec) with values between 1.05 and 1.5 (i.e., slightly extended)
ii) V - I (W2_F606W - W2_F814W) color betwen 0.0 and 1.0
iii) number of images in a match (>50).
The ORDER BY defines the order of the results (i.e. by matchID).
|
Now click Query. Change the context from MyDB to HSCv3 (if necessary) (blue). Note that forgetting to change the context is the most common error causing CasJobs queries to fail. Copy and paste the text from above into the blank query text box (green). Click Quick (orange) to submit the job. Since this is a Quick submission, the table is not saved to MyDB, but is instead listed below. If you want to save the table, add "INTO M87_V3" at the end of the query (see Step 7). The table can also be downloaded to a local file using the Save As button (yellow) at the bottom of the page. Another option is the Submit button, which is generally used for longer queries. The table is saved using the name in the box under "Table (optional)", which defaults to MyTable; change this to M87_V3 for our example. Try this. To see the table click the MyDB tab, select the MyDB context (if necessary), click on M87_V3, and click on Sample to see the file. |

|
 |
Step 4 - Examine an image. It is a good idea to look at the HSC overlayed on an image, to check for artifacts and uniformity. Copy the MatchRA and MatchDec values of the 7th source from your table. Open the HLA and paste those values into the search box (blue). Click Search. Note: The HLA displays your search coordinates in both decimal degrees and sexidecimal format (blue). This is useful if you want to find a specific object in the Interactive Display. In the Detector field enter *acs/wfc* (green) to select just the ACS Wide Field Camera images. Click on the Display (orange) button for the F814W/F606W (color) image (or click on the Images button if you would like to look at previews of all the images). |
|
Step 5 - Determine the value of NumImages to use. Click HSC controls, Require NumImages > 10, and then the HSC (blue) button to overlay the HSC on this particular image. We find that NumImages > 10 leaves a number of artifacts and apparently blank circles. If you click on a few of the real objects (green) you find they all have more than NumImages = 50. Some have over 200! Go back and change to Require NumImages > 60 (orange) to remove essentially all of the artifacts (although you are still missing some objects near the center of the galaxy). DETERMINING THE BEST VALUE OF NUMIMAGES IS OFTEN ONE OF THE MOST IMPORTANT DECISIONS YOU WILL HAVE WHEN USING THE HSC ! It is also interesting to note that there are 4 Gaia sources in the image, and they are all well aligned with HSC sources. Clicking on an object brings up the information for both the HSC and Gaia sources. |
|
 |
Step 6 - You can also use the MAST Discovery Portal to make the same query, since this is a relatively small dataset. Several other HSC Use Cases (e.g., #1: Using the Discovery Portal to Query the HSC - Stellar Photometry in M31; Brown et al. 2009) provide more detail. The Discovery Portal can also be used to make plots and to reach the HLA Interactive Display (like in Step 5). In this example we center on the coordinates of the object (blue) in the list from the CasJobs search in Step 3 to find the object with matchID = 409428 (orange). Also note that M87 has been visited 111 times using 216 different images (green) in this region! |
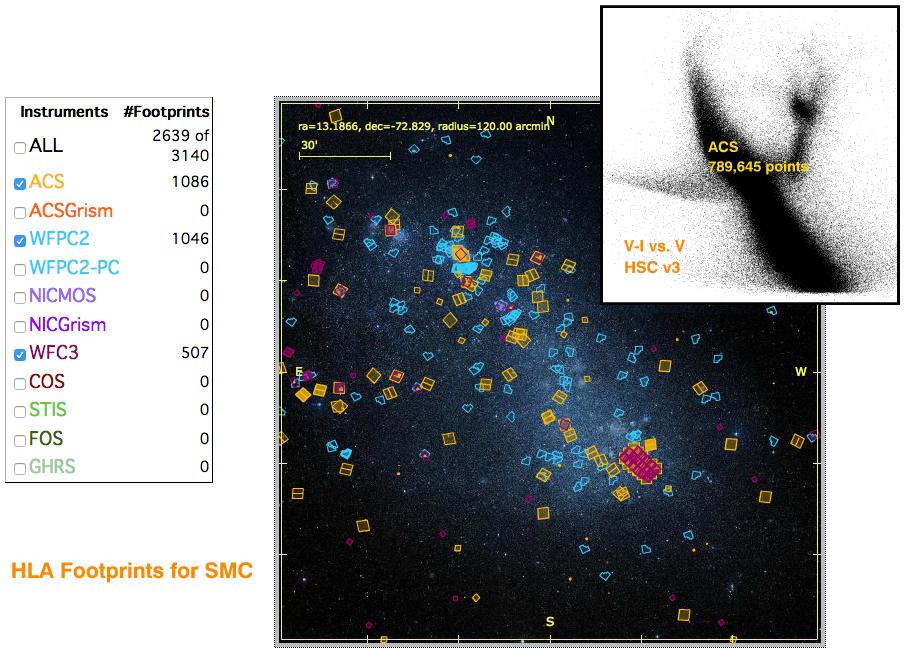
Step 7 - Now let's try something a little bigger by making a Color Magnitude Diagram (CMD) for the Small Magellanic Cloud (SMC) using the ACS data. Following similar steps to those described above, cut and paste the following text into a Query box, and hit the Submit button (since this is a longer query). The table smc_v3 should appear in MyDb in about 6 minutes or so.
SELECT
      MatchRA, MatchDEC, MatchID, CI, A_F555W, A_F814W, V_I=(A_F555W - A_F814W)
INTO
      smc_v3
FROM
     SearchSumCatalog(13.1866,-72.8286,7200,1)
WHERE CI > 0.9 and CI < 1.6
      and  A_F555W > 0 and A_F814W > 0
      and (A_F555W - A_F814W) < 1.5 and (A_F555W - A_F814W) > -1.5
      and numimages > 1
ORDER BY matchID
Next make the plot of V-I vs V shown in the upper right (flipped from how it will appear using CasJobs). This figure was made using version 3 of the HSC. There are 789,645 datapoints using hundreds of ACS fields, as shown in the HLA footprint image below! The entire exercise should only take a few minutes. Similar plots can be made for WFPC2 and WFC3.